
Advanced CQB Footwork 1: Turn Right, Turn Left
One of the most fundamental CQB movements is moving through a doorway and turning to either the right or left to clear the corner. This article does not claim to offer the only way to clear a corner, but rather aims to offer a series of concepts and options to help each individual or team refine their own techniques to a more advanced level.
Approaching the Door
Before you can determine the best footwork for clearing your corner, you must first determine how you will approach the door. There are a number of techniques currently being taught but most of them fall into two categories: 1) approaching the door head on, 2) approaching the door at an angle. There are a number of advantages and disadvantages to each.
Approaching the door head on (image A below) offers better visibility into the room as you approach. As you get closer and closer to the door, the angle of your vision expands exposing more and more of the room. This gives you more time to identify, acquire and engage targets. Approaching head-on also makes it easier and smoother to turn either direction (right or left) when entering the room. Finally, approaching the door head-on allows you to engage targets inside the roombeforestepping across the threshold and exposing yourself to all threats inside the room. Conducting this technique generally involves approaching the door initially at an angle, then swinging out in an arc while scanning the interior of the room until you are facing the door. The arc can either be shallow or wider depending on the situation.
There are disadvantages to approaching the door head-on. While you have better visibility into the room, you are also exposing yourself to threats within the room by standing in the “fatal funnel.” Also, with your primary focus on the doorway, you may also be more vulnerable to being shot by threats to either side.

General depiction of approaching head on (A) vs. approaching from an angle (B)
For this reason, some may choose to approach the door at an angle (image B above), avoiding the fatal funnel as long as possible before entering the room. However, while reducing your initial exposure, you will have to react very quickly when you finally step through the doorway since your senses will have to take in the entire room in an instant, as opposed to the previous technique where you cleared much of the room from the outside. Also, it is critical to ensure your shadow does not extend across the doorway since most walls are not bulletproof and if the adversary knows you are there, he/she can shoot you through the wall. Finally, when approaching from a steep angle, many techniques suggest “breaking down” the weapon to avoid letting the muzzle pass in front of the door, giving away your position. We will discuss the pros and cons of the various weapon handing techniques in a later article.
Head on Approach: Exposing the Muzzle vs. Correct Pivot
If you do approach the door head on, the key point to remember when practicing your footwork is not to let the muzzle of the weapon extend into the room first, giving away your position. If this happens, an adversary hiding in the corner will have additional time to react and shoot at you. Reference the example below.

Don’t let your muzzle extend past the doorway before you clear the corner
Therefore, the solution is to clear the immediate doorway area from outside the room and then pivot around the front of the weapon so the first thing an adversary sees is your muzzle pointing at his/her face. With practice, you can learn to do this quickly and smoothly while exposing as little of your body as possible. Reference the example below.
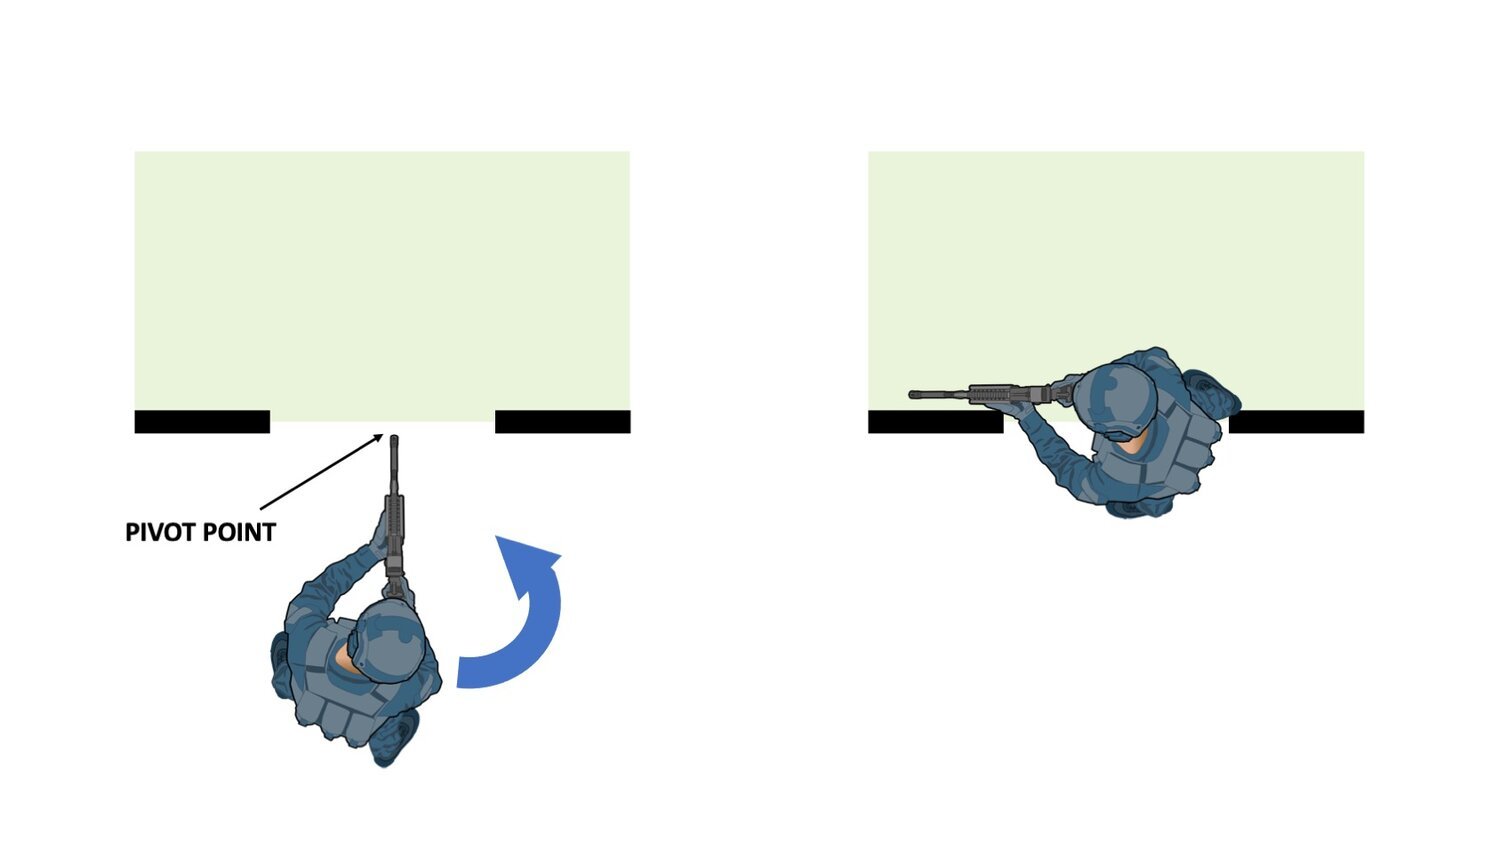
When approaching head-on, it is best to pivot around the muzzle to avoid exposing yourself to the corner
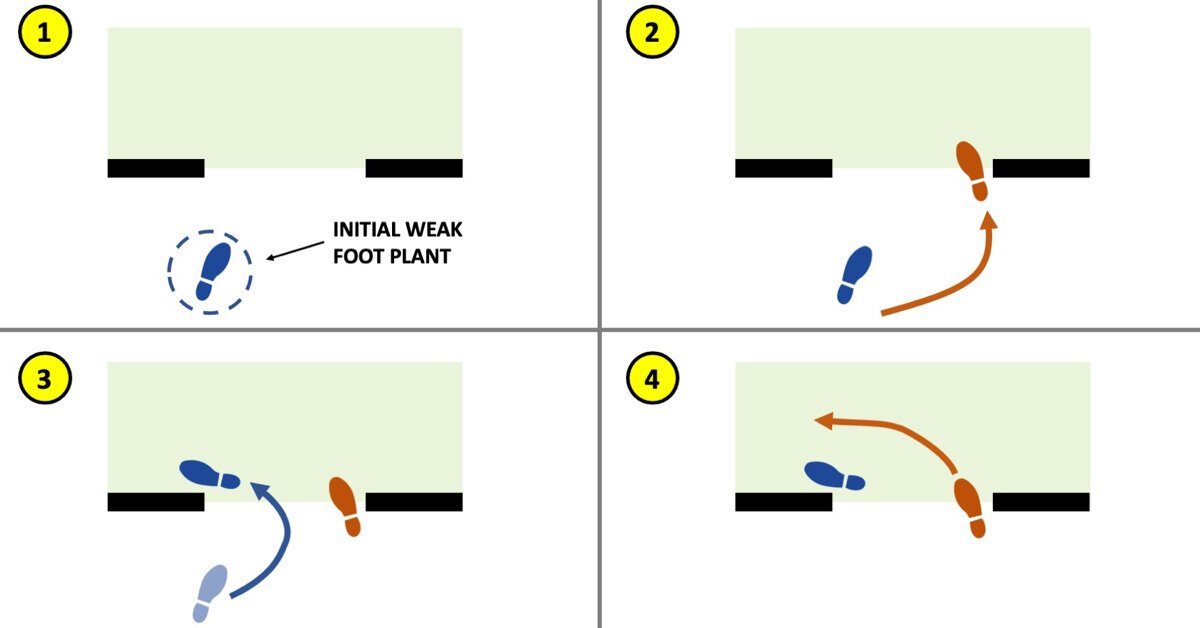
Right Turn (or Strong-Side Turn)
Many schools recommend that you do not decide beforehand if you are going to turn left or right when you enter the room. This offers you maximum flexibility to adjust to unexpected threats or room configurations. However, that also means that your footwork patterns cannot be too rigid. Also, if you are operating as part of a team, you do not know if you will be the first person into the room or if you will be following another team member. This too will affect your footwork and timing. Therefore, if you establish very rigid footwork patterns you may get confused, stutter-step or stumble when entering the room. In addition, if you get overly focused on your feet, you might find yourself looking at your feet instead of looking into the room for threats.
Footwork example for a right turn (or strong side turn)
Therefore, one technique we recommend is to generally practice planting the weak-side foot (left foot for a right-handed shooter) about 2-3 feet outside the door (1). The exact position will vary depending on if you are approaching head-on or at an angle. If you decide to turn right your next step will be slightly shorter as you begin to pivot around your weapon towards the corner (2). If you are approaching from an angle this will be less of a pivot and more of a slight outward step to set up your entry. Finally, you can step through the door with your weak-side foot as you finish pivoting as your muzzle comes into the room, pointed immediately and directly into the corner (3). After this you can step in with the strong side foot (4).
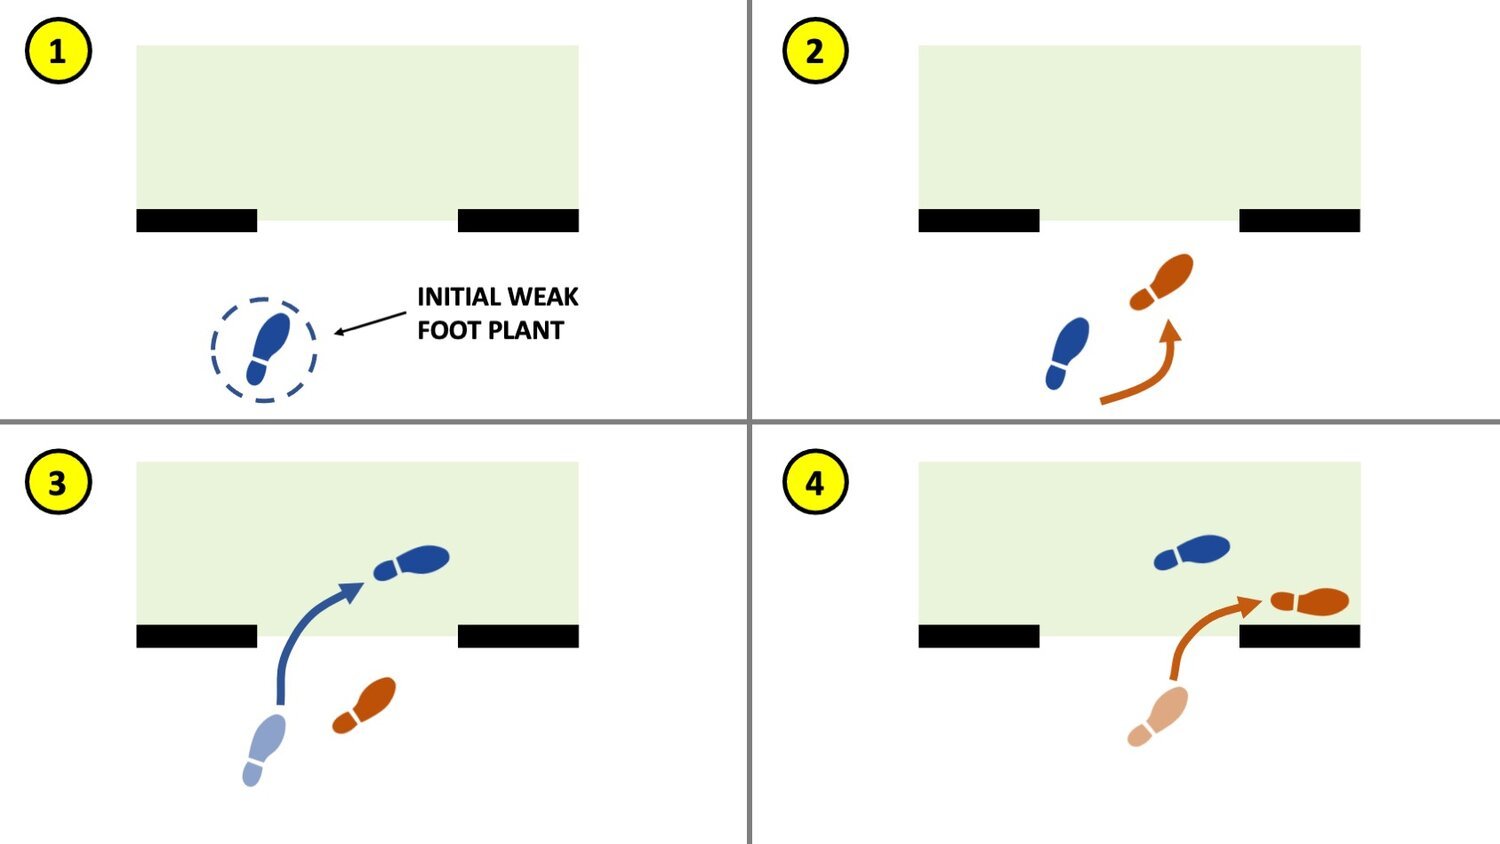
Left Turn (or Weak-Side Turn)

Example footwork for a left turn (weak-side turn)
If you decide to turn left, you still plant the weak-side foot (left foot for a right-handed shooter) about 2-3 feet outside the door (1). Since the initial foot placement is the same, it offers you the flexibility to rapidly decide to turn left or right based on immediate threats. If you decide to turn left your next step will be longer, placing your strong side foot near the door jam on the same side while pivoting your body to the left around the weapon (2). Widening your step to the right will make more room for the weapon if you are carrying a rifle and once again, the first thing an adversary hiding in the corner should see should be your muzzle. As you finish pivoting towards the corner, the weak-side foot can step forward into the room near the wall (3). Finally, the strong side foot can follow (4).
Putting the Technique Together
These are not intended to be hard-and-fast rules but rather concepts and guidelines for you to experiment with. These fundamental footwork principles can apply to a number of different entry techniques whether you are approaching head-on, at a steep angle or somewhere in between, using either a rifle or pistol. The most critical point is to practice the techniques and experiment with them to find how to adjust them to fit your personal preferences and body mechanics. The next article will cover practice methods and shooting drills to determine whether a given footwork technique is appropriate for you and how to adjust it if needed. In the meantime, please feel free to contribute your own thoughts and ideas by either posting on our social media sites, or sending an email to info@specialtactics.me.